Today is a beautiful day! I went for a run in the fresh Colorado air, my wonderful husband took our kids to the zoo and I am off to a craftfy blogger meet-up! Go out and do something fun today!
Pin It
Saturday, March 10, 2012
Wednesday, March 7, 2012
Fun Spring Crafts
2 x 4 blocks:
I saw these 2 x 4 blocks from How Does She and loved them. So much, that I prepped 50 sets of these for my MOPS group. Call me crazy...but it's all worth it when I see how much fun would be non-crafters have creating something useful and cute for their homes! If you want to make these, follow the wonderful tutorial found at How Does She. I couldn't find the cute clips they use, so went with mini clothes pins. I also opted for a non-St. Patrick's Day saying so I could use it next month also.


Here are a couple of my MOPS friends, Danika Demers and Danielle Bond with their blocks!

Julia asked if she could make some blocks for her room in pink. How could I say no? She loves all things crafty!

Subway Art:
These are everywhere in blog land! This is the first one I have printed out, but may start printing more. It's an easy and inexpensive way to decorate for a holiday or season. I have many pinned in Pinterest. Go check them out if you are looking for a fun one. In the end, I decided on the one designed by Every Creative Endeavor. I printed it out at Costco and slipped it into a frame I found at a garage sale for .50! My husband is always asking me, "Why do you need another frame?" Well, you just never know when you will need one, right! I placed a few books under the frame to add some height and paired it with my only living plant, a Christmas Cactus. My mom had a few of these when I was growing up, so they remind me of her and her love of plants.

Faux Vinyl Print:
One of my crafty friends had pinned this print from A Little Tipsy, to her St. Patty's pin board and it called my name. Rather than putting this in a frame I decided to modge podge it to a scrap board and prop it next to a family photo. Doesn't it look great?

I painted the sides of the board a dark green to go with the colors in the print. Let the paint dry, then cover the top of the board with Modge Podge and gently lay the print down. Smooth it out so there aren't any bubbles and let it dry. Then paint over the print with another layer of Modge Podge. This will give it a more finished look. Now find the perfect spot to lean your board.

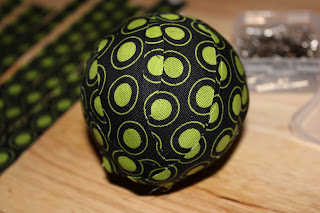
Fabric Covered Balls:
I first made these at a craft night hosted by Landee See Landee Do. I had been following her blog for a while and then saw that she was local to Colorado! My husband was a bit worried that I may be in danger, since I didn't know this blogger. But really, do craft bloggers hurt other crafters. I think it's a rule written in vinyl that we can create together safely! I had a fantastic time, not to mention I was able to check out all of Landee's home projects first hand.
Materials: fun fabrics, styrofoam balls, scissors and pins

Cut some strips of fabric and pint it to your ball. Continue pinning until your ball is covered. Then put them in a wire basket, glass bowl, vase or in my case a lantern.


Have fun and get crafting!
I am linking up at 52 Mantels, The 36th Avenue, The CSI Project, Every Creative Endeavor
I saw these 2 x 4 blocks from How Does She and loved them. So much, that I prepped 50 sets of these for my MOPS group. Call me crazy...but it's all worth it when I see how much fun would be non-crafters have creating something useful and cute for their homes! If you want to make these, follow the wonderful tutorial found at How Does She. I couldn't find the cute clips they use, so went with mini clothes pins. I also opted for a non-St. Patrick's Day saying so I could use it next month also.


Here are a couple of my MOPS friends, Danika Demers and Danielle Bond with their blocks!

Julia asked if she could make some blocks for her room in pink. How could I say no? She loves all things crafty!

Subway Art:
These are everywhere in blog land! This is the first one I have printed out, but may start printing more. It's an easy and inexpensive way to decorate for a holiday or season. I have many pinned in Pinterest. Go check them out if you are looking for a fun one. In the end, I decided on the one designed by Every Creative Endeavor. I printed it out at Costco and slipped it into a frame I found at a garage sale for .50! My husband is always asking me, "Why do you need another frame?" Well, you just never know when you will need one, right! I placed a few books under the frame to add some height and paired it with my only living plant, a Christmas Cactus. My mom had a few of these when I was growing up, so they remind me of her and her love of plants.

Faux Vinyl Print:
One of my crafty friends had pinned this print from A Little Tipsy, to her St. Patty's pin board and it called my name. Rather than putting this in a frame I decided to modge podge it to a scrap board and prop it next to a family photo. Doesn't it look great?

I painted the sides of the board a dark green to go with the colors in the print. Let the paint dry, then cover the top of the board with Modge Podge and gently lay the print down. Smooth it out so there aren't any bubbles and let it dry. Then paint over the print with another layer of Modge Podge. This will give it a more finished look. Now find the perfect spot to lean your board.

Fabric Covered Balls:
I first made these at a craft night hosted by Landee See Landee Do. I had been following her blog for a while and then saw that she was local to Colorado! My husband was a bit worried that I may be in danger, since I didn't know this blogger. But really, do craft bloggers hurt other crafters. I think it's a rule written in vinyl that we can create together safely! I had a fantastic time, not to mention I was able to check out all of Landee's home projects first hand.
Materials: fun fabrics, styrofoam balls, scissors and pins

Cut some strips of fabric and pint it to your ball. Continue pinning until your ball is covered. Then put them in a wire basket, glass bowl, vase or in my case a lantern.


Have fun and get crafting!
I am linking up at 52 Mantels, The 36th Avenue, The CSI Project, Every Creative Endeavor
Monday, March 5, 2012
Moss Letter Tutorial
I pinned this project a while back and it's been on my to make list. I thought it would be perfect for St. Patrick's Day/spring. I checked out the wonderful tutorial found on Dear Lillie, gathered the materials and then got started.

I used 2 pieces of cardboard, sharp scissors (I was wishing I had a good exacto knife.), print out of the letter in the font you want, moss ( I used a roll from Joanne's, but I think the Dollar store and Micheal's have it also. I wouldn't recommend using moss from a bag.), hot glue gun and lots of glue.
1. Find the font you want to use. I went with Century Schoolbook enlarged to size 600. I then printed it out using the poster format on my printer. Then cut it out and tape it together.

2. Use this to trace your letter onto the cardboard. I started with one piece, but it seemed a bit flimsy so I cut out another and hot glued them together.

3. Now lay your cardboard letter down on your moss. Cut the moss out about an inch around your letter. Save the scraps for later.


4. Use your hot glue gun to adhere the moss to the back of your letter. I used a pencil to press down the moss so I wouldn't burn my fingers. Continue around until you are finished.

5. Now use your scraps to fill in the back, if you want to. The tutorial I was following, did this. But it's up to you. It does however give it a more finished look. My Grammy's words came to mind when I was doing this. "The back should look just as nice as the front."

Now hang, or place it and admire! I just love this idea!
My next mossy project is seen at two twenty one!
I am linking up at Brassy Apple, Tip Junkie, Sugar Bee Crafts, Oopsey Daisy, The 36th Avenue, 52 Mantels, The CSI Project, Every Creative Endeavor
Book Page Decorations
It was my turn to host book club this month. So I decided to decorate for the occasion with book pages (taken from a past book choice - The Hangman's Daughter).
I started with a book page banner found at simple as that. This was a quick craft that my daughter Julia helped me with, and later made one of her own for her door.


I also enlisted Julia and Trevor to watercolor book pages to hang from my branch. I saw this somewhere on pinterest that was done with fall leaves, but didn't end up pinning the idea so I am not sure who to credit. For the left over clovers I placed them in the glasses to add some fun and also used them to spruce up my heart wreath I made at the last craft night (idea from Flower Patch Farmgirl).


I love crafting with book pages, there is just something about words and the black/white combo!
Do you like the "Oh so LUCKY to have you!" print? You can find it at A Little Tipsy.
I am linking up at Brassy Apple, Tip Junkie, Sugar Bee Crafts, Oopsey Daisy, The36th Avenue, 52 Mantels, The CSI Project, Every Creative Endeavor
My Spring-Pinterest Mantel
I love spring all most as much as I love fall!
I know it's not officially spring yet, and I am sure we will be hit with a lot more snow. But for now, I want to relish the sun and the thought of my bulbs sprouting (soon). I have been gathering many fun ideas via pinterest for St. Patrick's Day and spring. Here...all the ideas came together! I know I need something more in the center...it just hasn't come to me yet! Check back for tutorials and links for all the fun crafts.

I know it's not officially spring yet, and I am sure we will be hit with a lot more snow. But for now, I want to relish the sun and the thought of my bulbs sprouting (soon). I have been gathering many fun ideas via pinterest for St. Patrick's Day and spring. Here...all the ideas came together! I know I need something more in the center...it just hasn't come to me yet! Check back for tutorials and links for all the fun crafts.

I am linking up at Brassy Apple, Sugar Bee Crafts, Tip Junkie, Oopsey Daisy, 52 Mantels, The CSI Project, Every Creative Endeavor
Subscribe to:
Posts (Atom)