Friday, December 6, 2013

Wow!  It has been over a year since I last blogged!  So much has happened...

I am back teaching kindergarten!  I am so thankful for the time I had to watch my babies grow these past six years!  My little guy, started full day kindergarten in August.  He has an incredible teacher and is such a little reader and writer now.  Just the other day, he wrote out the lyrics to "What does the fox say?"  What a funny boy!  My eight year old twins are in third grade.  That is so hard for me to believe.  My first year teaching, way back in 2000, I had a great class of third graders.  But they seemed so old.  I had a student who was immersed in Harry Potter every free moment.  Now, third graders don't seem nearly as intimidating as they did then.

I got off topic for a moment, I am now teaching full day kindergarten.  I have a diverse class of 22 students who are from all over the world and speak many different languages.  This population, is much different than previous classes that I have taught.  But, some things remain the same...zoophonics is still an effective and fun way to teach letters and sounds, students still need to develop problem solving skills, music and fun moves are essential and I continue to love all the happy kindergarten projects.  Although now I post a learning target next to the bulletin board or next to the recipe as we make pumpkin pie.  This has been a huge change since I taught full time.  Everything needs to be linked to reading, writing or math.  That doesn't mean I am not going to have my students decorate gingerbread men.  It just means, I am going to take it further and have students write about their masterpiece!  I also love to see growth!  I get excited when students who enter school not knowing a letter or sound, not knowing how to write their name begin to sound out words and write sentences. Yeah!

It has been difficult juggling work, home and family.  Long staff meetings, rushing to musical performances, class parties, homework, dinner, reading bed time stories, planning for school, cleaning, grocery shopping, making lunches for the next day...the list goes on and on.  I asked my sister how she does it.  She replied, "Practice".  I guess everything takes practice.

So why juggle 3 balls, when you can try 4?  I thought why not have a craft night?  I can't really remember the last time I crafted, it has been that long.  I enjoy making things and hanging out with fun people and this would be the perfect excuse.

Craft Night, Saturday December 14, 2013 at 7:30 p.m.  Please let me know by Dec. 8 9 p.m. if you are interested and what you would like to make.  Let's get crafty!

Here are the craft choices:

#1- ornament blocks (I love these!)  We have made these before, but can you ever get enough wood blocks? $2 each as seen on How Does She. (includes wood block, metal hook, paper, ribbon) Feel free to bring paper of your choice.


#2- Initial Ornament - $4 (includes wooden letter, metal hook, personalized name and year, twine or ribbon)
 I led this craft at MOPS a couple years back and it was a hit.  This can be found on Two Peas in a Bucket.


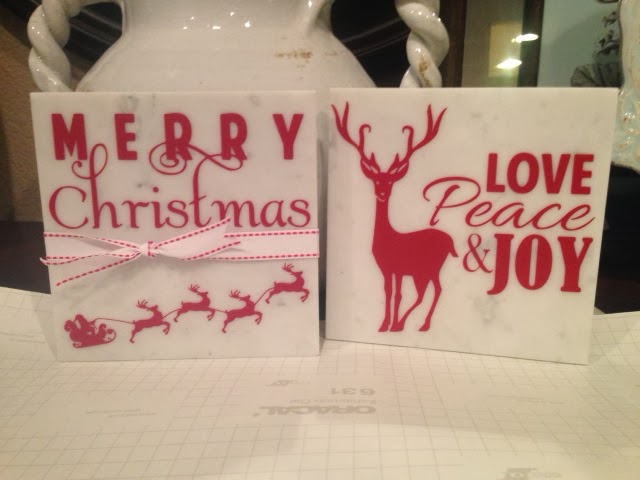
#3- 6" x 6" Tiles - $5 (includes tile & vinyl)  Please specify what color tile, what color vinyl and the picture.
These are designed and made by Say Anything Expressions.


#4-  4" X 24" Days Until sign - $12 (includes board, vinyl, chalkboard paint) similar to the board seen here  Craftiness is not Optional.


#5-  4" X 24"  Eat, Drink & Be Merry - $12 (includes board, vinyl, red paint) similar to board seen here on Signs by Andrea.


I know it's very short notice, please let me know by Sunday night (Dec. 8) if you are able to join in the fun and what you would like to make.

Thursday, September 27, 2012

Fall Craft Night

Yeah!  It's Fall!  I love it when the leaves change colors.  When it gets a little cooler.  When we go to the pumpkin patch.

When my kids dress up and go trick-or-treating (of course I love the candy they collect also!).  This is a picture of them from last year.  Aren't they cute?


And we can't forget my birthday is in the Fall.  I am going to be 36 this year.  I can't believe it!  Oh well, on with the fun crafts...I had wanted to make these projects this week, but with teaching again and the day to day busyness of life with three children it didn't happen.

October Craft night will be on the 5th at 7:30p.m.  I need to know by this Sunday if you would like to come and craft with us fun gals.  This will give me the time needed to gather the materials and prep everything.  Sorry for the short notice.

#1 - 10" X 24" Harvest or Halloween Subway Art - $20 (includes vinyl words, board and paint - I will have black and brown, if you would like something different please bring your own color.)


#2- 4" X 24" count your blessings or Trick or Treat sign (the font is a bit different, but just as cute!) - $12 (includes board, vinyl, black or brown paint)


#3- orange felt garland seen in the above picture - $4

Happy Fall!  I look forward to getting crafty with you all.


Friday, April 20, 2012

April Craft Night

Happy Spring!  Has it really been 3 months since the last craft night?  That hasn't stopped me from being crafty...but now we can get together and be crafty together!

Join me and some fun girls next Friday, April 27th at 7:30 at my house.  You can choose a craft here or bring something that you have been working on.  If you decide to make a craft listed here, please let me know by Monday, April 23 so I can prep all the materials.


#1- Little Picket Fence - $14.00
I saw this first at Oopsey Daisy.  Click on it and check it out.  You can hang it on your door, prop it on your mantel or stake it in your flowerbed.  It's up to you!  Thanks, Heather for suggesting the this as our craft!  I love it!  Please tell me what color you would like to paint it and the name or word you would like in white vinyl.  I added the burlap banner, because I am loving burlap.  But feel free to bring paper or another fabric to make your own banner.  If you choose to make a burlap one it will cost an additional $2.00.


#2- Moss Letter - $6.00
I saw these at Dear Lillie and made one for myself.  Check here for the tutorial.  Then, I prepped this project for my wonderful MOPS group!  Pictured above is Kindra, a friend from MOPS.  Didn't she do a great job?  I am offering it again for craft night because I love moss almost as much as burlap, they are super cute and lots of you aren't in MOPS, so you haven't made them already.  Check this link out, Pottery Barn is selling these for $79.00.


#3- Wood Blocks - $6.00
I prepped tons of these for a past MOPS craft and have lots left over.  Go here check to them out.  These would make great mother's day gifts or just something fun for your home.  Please bring your own scrapbook paper.  I will have modge podge, twine (if you want ribbon please bring your own), clips.  Please also tell me what you would like the vinyl at the bottom to say.


Pin It

Monday, April 2, 2012

Lego Banner


I pinned this Super Hero banner from One Charming Party (click over and check it out), a while back and wanted to alter it to use the many Lego boxes my own Lego Master has collected.  Trevor was holding on to them like they were treasures.  When I talked him into letting my make something out of them, I got right to work.  In the link above, the banner is made by sewing comic book pages into red bias tape.  I knew this wasn't an option for the boxes so I made it work with these materials: boxes, red duct tape, exacto knife, banner template.

First, I made a banner template by folding a piece of 8 x 11 paper in half and then folding the corners in to meet at the center.  I traced the template onto the boxes and used an exacto knife to cut them out (I started with scissors, but it didn't work so well).


When I had all the pieces cut out, I layed them in the order I wanted them to hang.  I used my long kitchen counter to pull out the red duct tape. (I haven't used colorful duct tape before, but ended up liking it.)


I positioned all the Lego triangles at the mid line in the tape.  Next, carefully fold the tape over to secure the banner in place.


Now, find the perfect place to hang it!  When Trevor saw the Lego banner hanging in his room, he loved it!


He loved it so much that I found him working on his own Lego banner at 6:30am the next morning, after digging through the recycle bin to find what I thought were scraps!


I realized at that moment, my mom's love of crafts is living on through me into her grandchildren.

I linked up at Brassy AppleSkip To My Lou
Pin It

Saturday, March 10, 2012

Spring Soiree

Today is a beautiful day!  I went for a run in the fresh Colorado air, my wonderful husband took our kids to the zoo and I am off to a craftfy blogger meet-up! Go out and do something fun today!
Pin It

Wednesday, March 7, 2012

Fun Spring Crafts

2 x 4 blocks:
I saw these 2 x 4 blocks from How Does She and loved them.  So much, that I prepped 50 sets of these for my MOPS group.  Call me crazy...but it's all worth it when I see how much fun would be non-crafters have creating something useful and cute for their homes!  If you want to make these, follow the wonderful tutorial found at How Does She.  I couldn't find the cute clips they use, so went with mini clothes pins.  I also opted for a non-St. Patrick's Day saying so I could use it next month also.


Here are a couple of my MOPS friends, Danika Demers and Danielle Bond with their blocks!


Julia asked if she could make some blocks for her room in pink.  How could I say no?  She loves all things crafty!


Subway Art:
These are everywhere in blog land!  This is the first one I have printed out, but may start printing more.  It's an easy and inexpensive way to decorate for a holiday or season.  I have many pinned in Pinterest.  Go check them out if you are looking for a fun one.  In the end, I decided on the one designed by Every Creative Endeavor.  I printed it out at Costco and slipped it into a frame I found at a garage sale for .50!  My husband is always asking me, "Why do you need another frame?"  Well, you just never know when you will need one, right!  I placed a few books under the frame to add some height and paired it with my only living plant, a Christmas Cactus.  My mom had a few of these when I was growing up, so they remind me of her and her love of plants.


Faux Vinyl Print:
One of my crafty friends had pinned this print from A Little Tipsy, to her St. Patty's pin board and it called my name.  Rather than putting this in a frame I decided to modge podge it to a scrap board and prop it next to a family photo.  Doesn't it look great?


I painted the sides of the board a dark green to go with the colors in the print.  Let the paint dry, then cover the top of the board with Modge Podge and gently lay the print down.  Smooth it out so there aren't any bubbles and let it dry.  Then paint over the print with another layer of Modge Podge.  This will give it a more finished look.  Now find the perfect spot to lean your board.


Fabric Covered Balls:
I first made these at a craft night hosted by Landee See Landee Do.  I had been following her blog for a while and then saw that she was local to Colorado!  My husband was a bit worried that I may be in danger, since I didn't know this blogger.  But really, do craft bloggers hurt other crafters.  I think it's a rule written in vinyl that we can create together safely!  I had a fantastic time, not to mention I was able to check out all of Landee's home projects first hand.

Materials: fun fabrics, styrofoam balls, scissors and pins


 Cut some strips of fabric and pint it to your ball.  Continue pinning until your ball is covered.  Then put them in a wire basket, glass bowl, vase or in my case a lantern.


Have fun and get crafting!

I am linking up at 52 MantelsThe 36th AvenueThe CSI ProjectEvery Creative Endeavor

Monday, March 5, 2012

Moss Letter Tutorial

I pinned this project a while back and it's been on my to make list.  I thought it would be perfect for St. Patrick's Day/spring.  I checked out the wonderful tutorial found on Dear Lillie, gathered the materials and then got started.


I used 2 pieces of cardboard, sharp scissors (I was wishing I had a good exacto knife.), print out of the letter in the font you want, moss ( I used a roll from Joanne's, but I think the Dollar store and Micheal's have it also.  I wouldn't recommend using moss from a bag.), hot glue gun and lots of glue.

1. Find the font you want to use.  I went with Century Schoolbook enlarged to size 600.  I then printed it out using the poster format on my printer.  Then cut it out and tape it together.


2. Use this to trace your letter onto the cardboard.  I started with one piece, but it seemed a bit flimsy so I cut out another and hot glued them together.


3.  Now lay your cardboard letter down on your moss.  Cut the moss out about an inch around your letter.  Save the scraps for later.


4. Use your hot glue gun to adhere the moss to the back of your letter.  I used a pencil to press down the moss so I wouldn't burn my fingers.  Continue around until you are finished.


5. Now use your scraps to fill in the back, if you want to.  The tutorial I was following, did this.  But it's up to you.  It does however give it a more finished look.  My Grammy's words came to mind when I was doing this.  "The back should look just as nice as the front."


Now hang, or place it and admire!  I just love this idea!
My next mossy project is seen at two twenty one!

I am linking up at Brassy AppleTip JunkieSugar Bee CraftsOopsey DaisyThe 36th Avenue52 MantelsThe CSI ProjectEvery Creative Endeavor